Blender でスクリプトを使ってレンダリング
概要
この記事で 3D モデルのアニメーションをレンダリングして連番の画像を生成するようなことをしていました。
このときは手動でやっていたんですがアニメーションが複数種類あって、種類によってはモデルの向きを変えてレンダリングするものもあったため 手動でこれを切り替えてレンダリングするのはかなり面倒でした。
Blender では Python スクリプトで色々な操作をすることができるらしく、こうした作業は自動でできそうなため調べてやってみたという内容です。
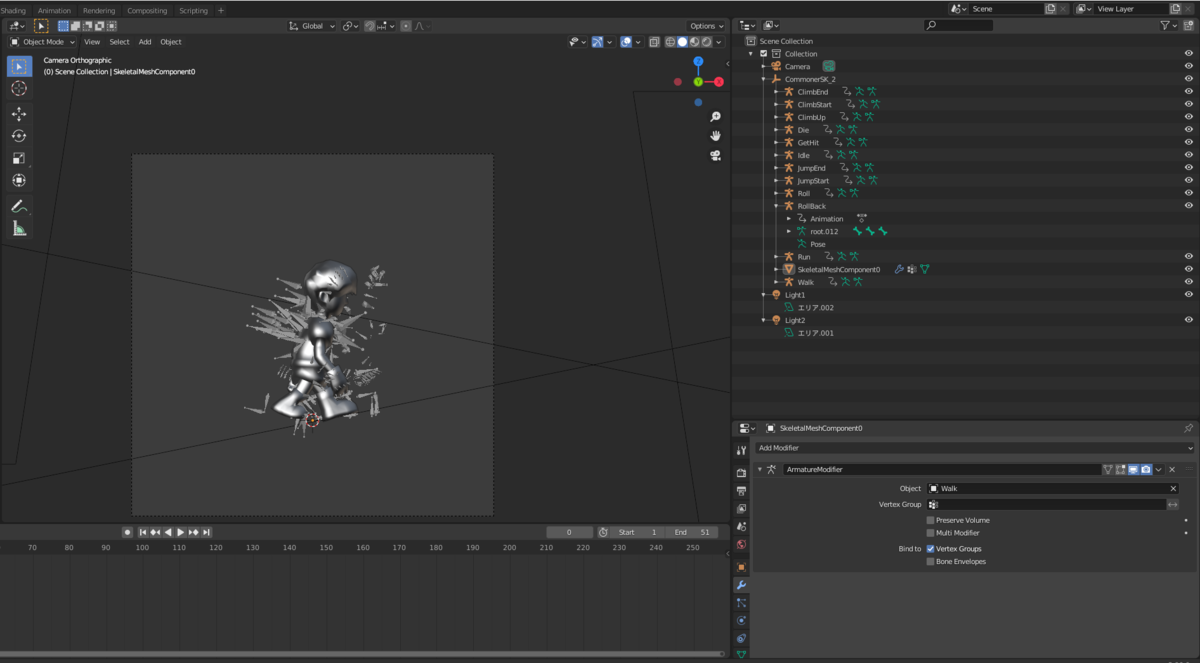
使った Blender ファイルの構造

キャラクターの 3D モデルが一つあって、アニメーションはそれぞれ別々のアーマチュアについています。
アニメーションを切り替えるときはアーマチュアモディファイアを変更するというやり方をしています。
アーマチュア別々になっているのは UE4 からエクスポートしたモデルをインポートしているためこのようになっています。
(この構造もちょっと変なのでスクリプトでアニメーションを一つのアーマチュアにまとめることもできるかもしれません。)
レンダリングに使ったスクリプトの内容
かなりやっつけで書いたスクリプトなので全然汎用性はありません。 オブジェクトの構造や名前が違うと動きませんが参考にスクリプトを載せておきます。
このスクリプトでやっていることは下のような操作です。
import bpy
import math

def render_animation(armature_name):
    bpy.context.scene.render.filepath = "//out/" + armature_name + "/"
    bpy.context.scene.frame_start = int(bpy.data.objects[armature_name].animation_data.action.frame_range[0] + 0.5)
    bpy.context.scene.frame_end = int(bpy.data.objects[armature_name].animation_data.action.frame_range[1] + 0.5)
    bpy.context.view_layer.objects.active = bpy.context.scene.objects["CommonerSK_2"]
    bpy.context.object.location[0] = -0.16
    bpy.context.object.location[1] = 0.0
    bpy.context.object.location[2] = 0.0
    bpy.context.object.rotation_euler[0] = 0.0
    bpy.context.object.rotation_euler[1] = 0.0
    bpy.context.object.rotation_euler[2] = math.pi * 0.5
    bpy.context.view_layer.objects.active = bpy.context.scene.objects["SkeletalMeshComponent0"]
    bpy.context.object.modifiers["ArmatureModifier"].object = bpy.data.objects[armature_name]
    bpy.ops.render.render(animation=True)

def render_behind_animation(armature_name):
    bpy.context.scene.render.filepath = "//out/" + armature_name + "_Behind/"
    bpy.context.scene.frame_start = int(bpy.data.objects[armature_name].animation_data.action.frame_range[0] + 0.5)
    bpy.context.scene.frame_end = int(bpy.data.objects[armature_name].animation_data.action.frame_range[1] + 0.5)
    bpy.context.view_layer.objects.active = bpy.context.scene.objects["CommonerSK_2"]
    bpy.context.object.location[0] = 0.0
    bpy.context.object.location[1] = 0.0
    bpy.context.object.location[2] = 0.0
    bpy.context.object.rotation_euler[0] = 0.0
    bpy.context.object.rotation_euler[1] = 0.0
    bpy.context.object.rotation_euler[2] = math.pi
    bpy.context.view_layer.objects.active = bpy.context.scene.objects["SkeletalMeshComponent0"]
    bpy.context.object.modifiers["ArmatureModifier"].object = bpy.data.objects[armature_name]
    bpy.ops.render.render(animation=True)

armature_names = [
  "ClimbEnd",
  "ClimbStart",
  "ClimbUp",
  "Die",
  "GetHit",
  "Idle",
  "JumpEnd",
  "JumpStart",
  "Roll",
  "RollBack",
  "Run",
  "Walk"
]

behind_armature_names = [
  "ClimbEnd",
  "ClimbStart",
  "ClimbUp"
]

for armature_name in armature_names:
  render_animation(armature_name)

for armature_name in behind_armature_names:
  render_behind_animation(armature_name)
CLI で実行
スクリプト実行は Blender 実行中に Scripting タブでもできますが、CLI から Blender を起動せずに実行することもできます。
オプションの渡し方がいまいちわかってないですが、下のような感じで実行できました。
blender --background -noaudio Model.blend --python render.py
CLI のマニュアルはこれのようです。
やりたい操作に対応する API の探し方
最初は API ドキュメントから探そうとしてたんですが量が多すぎてここから検索して探すというのは結構難しいです。
Blender を手動で操作した後に Scripting タブを開いて履歴を見ると対応する操作がわかるので、これを参考にするというのがやりやすそうでした。
このキャプチャ画像のように左下あたりに出ています。
